
Localizing your app with Flutter's new gen_l10n tool
March 9, 2020
This feature has now gone stable and the instructions below are no longer accurate.
Read the updated post for up to date instructions.
I'm recently getting into Flutter so I'm still figuring out some common practises. I was surprised to find that the recommended approach for internationalization was quite cumbersome and laborious.
Fortunately, the Flutter team is working on a simplified i18n process that can already be used today and in this post I'll show you how!
Proposed new i18n process
The proposed workflow for this new i18n process is as follows:
Start with handwritten
.arbfiles. One of these files will contain the standard per-message metadata required by the intl package.A new tool (
gen_l10n) will be used to generate a single class that contains one method per message.Message lookup is based on the inherited locale, using the current
BuildContext:MyLocalizations.of(context).myMessage
Compared to some other solutions available on https://pub.dev this has a few advantages in my opinion:
- Since this solution uses code generation, the compiler will help you use your localized messages correctly. This also means that your IDE can autocomplete translations keys.
- It's based on the official intl package.
- It uses a pretty versatile localization format (ARB).
- It's an official solution encouraged by the Flutter team.
In the following section I'll describe how to adopt this workflow for an existing project.
Adopt gen_l10n for an existing project
To get started we need a few new dependencies.
Add gen_l10n dependencies
The code generated by gen_l10n depends on the intl and flutter_localizations package, so add these to your dependencies:
# pubspec.yaml
dependencies:
  # ... other dependencies ...
  flutter_localizations:
    sdk: flutter
  intl: ^0.16.0
The gen_l10n tool itself depends on intl_translation, so add this as a development dependency:
# pubspec.yaml
dev_dependencies:
  # ... other dev dependencies ...
  intl_translation: ^0.17.9
Define translations
Ok, so now we have all dependencies we need, let's start by defining some localized messages.
Create a directory in your project to store your localized messages. This can be any directory you like, I'm using lib/i18n:
mkdir lib/i18nIn this directory create a file called messages_en_US.arb. The name messages here can be anything you want, but the last part of the file name should refer to the locale of the messages inside.
As you can see this file is an ARB file, an Application Resource Bundle. It's a localization resource format designed by Google. You can read the specification here.
Now to define localised messages we'll start by adding the messages we want to localize to the messages_en_US.arb file we created earlier. I won't dive into everything the ARB format supports, but it's a pretty versatile format so be sure to read the specification I linked above!
{
  "greeting": "Hello, world!",
  "@greeting": {
    "type": "text",
    "description": "A friendly greeting."
  },

  "newMessages": "{newMessages, plural, =0 {No new messages} =1 {One new message} other {{newMessages} new messages}}",
  "@newMessages": {
    "type": "text",
    "description": "Number of new messages in inbox.",
    "placeholders": {
      "newMessages": {}
    }
  }
}
As you can see for every message we want to localize we add both a key and a meta key to the file. The key is how you will refer to the localized message from your code later and the meta key is that same key prefixed with @. These meta keys only need to be added in one of the locales; the locale you will use as a template.
In the example above we have both a simple message greeting and a more complex, pluralized, message that changes depending on a piece of context'; the number of new messages in this case.
Now for every other language we want to support we need to create matching files with the desired locale in the lib/i18n directory we created earlier. For example I'm going to translate these messages in Dutch so I'll add a file named messages_nl_NL.arb with the following contents:
{
  "greeting": "Hallo, wereld!",
  "newMessages": "{newMessages, plural, =0 {Geen nieuwe berichten} =1 {Één nieuw bericht} other {{newMessages} nieuwe berichten}}"
}
As you can see in this case the file only contains the keys themselves and no metadata.
Generate localization classes
With everything prepared we can now use the gen_l10n tool to generate the Dart classes we'll use to access these localized messages in our code.
As the gen_l10n is still experimental it's not yet distributed as a package on the package registry. Instead it's bundled with the Flutter SDK itself. The tool is located in the Flutter SDK at dev/tools/localization/gen_l10n.dart. In my case the Flutter SDK is installed in /Users/Pascal/.asdf/installs/flutter/1.12.13+hotfix.8-stable/ so the full path to the tool is /Users/Pascal/.asdf/installs/flutter/1.12.13+hotfix.8-stable/dev/tools/localization/gen_l10n.dart.
From your terminal, run the gen_l10n tool from the root of your Flutter project as follows:
flutter pub run "/path/to/flutter/sdk/dev/tools/localization/gen_l10n.dart" --arb-dir lib/i18n --template-arb-file=messages_en_US.arb --output-localization-file=translations.dart --output-class=Translations(Be sure to replace /path/to/flutter/sdk above with the actual path to your Flutter SDK!)
This will generate a couple of files in lib/i18n:
lib/i18n
├── messages_all.dart
├── messages_en_US.dart
├── messages_nl_NL.dart
├── messages_en_US.arb
├── messages_nl_NL.arb
└── translations.dart
All these files should be checked into version control. The only files you manually edit, however, are the ARB files. Don't touch the generated Dart files :-)
Make localized messages available via BuildContext
To make Flutter aware of our localized messages we need to configure the localizationsDelegates and supportedLocales properties on the MaterialApp widget.
In your lib/main.dart file import the generated translations file:
import 'package:hello_world/i18n/translations.dart';And configure the MaterialApp widget to pick up your translations:
MaterialApp(
  // ... other properties ...
  localizationsDelegates: Translations.localizationsDelegates,
  supportedLocales: Translations.supportedLocales
)
Use localized messages
With all these out of the way, we can now actually use our localized messages.
From any widget in the widget tree below MaterialApp you can now access your localized messages.
Start by importing the generated translations.dart file:
import 'package:hello_world/i18n/translations.dart';And use the messages defined in the ARB files:
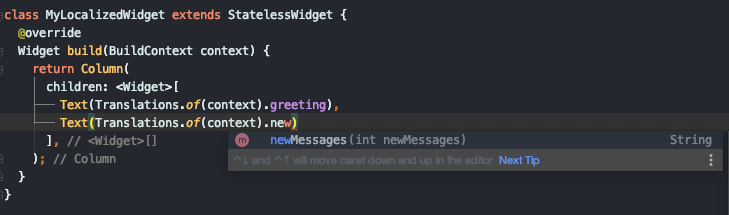
class MyLocalizedWidget extends StatelessWidget {
Widget build(BuildContext context) {
return Column(
children: <Widget>[
Text(Translations.of(context).greeting), // "greeting"
Text(Translations.of(context).newMessages(10)) // "newMessages"
],
);
}
}The compiler will check you're using your messages correctly and the IDE will help you with great autocompletion:
 .
.
Happy i18n-ing! 🎉

